<?xml version="1.0" encoding="utf-8"?><feed xmlns="http://www.w3.org/2005/Atom" ><generator uri="https://jekyllrb.com/" version="4.4.1">Jekyll</generator><link href="http://localhost:4000/feed.xml" rel="self" type="application/atom+xml" /><link href="http://localhost:4000/" rel="alternate" type="text/html" /><updated>2026-08-18T01:00:34+03:00</updated><id>http://localhost:4000/feed.xml</id><title type="html">OSCE3.COM</title><subtitle>An amazing website.</subtitle><author><name>Hamza Nadeem</name></author><entry><title type="html">How to compile flask nodejs java php</title><link href="http://localhost:4000/web-hacking/how-to-compile-flask-nodejs-java-php" rel="alternate" type="text/html" title="How to compile flask nodejs java php" /><published>2025-01-15T00:00:00+03:00</published><updated>2025-01-15T00:00:00+03:00</updated><id>http://localhost:4000/web-hacking/How-to-compile-flask-nodejs-java-php</id><content type="html" xml:base="http://localhost:4000/web-hacking/how-to-compile-flask-nodejs-java-php"><![CDATA[<p>Content coming soon.</p>]]></content><author><name>Hamza Nadeem</name></author><category term="web-hacking" /><category term="debugging" /><summary type="html"><![CDATA[Content coming soon.]]></summary><media:thumbnail xmlns:media="http://search.yahoo.com/mrss/" url="http://localhost:4000/assets/images/debugger1.png" /><media:content medium="image" url="http://localhost:4000/assets/images/debugger1.png" xmlns:media="http://search.yahoo.com/mrss/" /></entry><entry><title type="html">Windows 32-bit Custom Shellcode Development Part 1</title><link href="http://localhost:4000/windows-32bit-custom-shellcode-development/part1/" rel="alternate" type="text/html" title="Windows 32-bit Custom Shellcode Development Part 1" /><published>2025-01-15T00:00:00+03:00</published><updated>2025-01-15T00:00:00+03:00</updated><id>http://localhost:4000/windows-32bit-custom-shellcode-development/Windows32-bit-custom-shellcode-part1</id><content type="html" xml:base="http://localhost:4000/windows-32bit-custom-shellcode-development/part1/"><![CDATA[<style>
   .one-word-highlight {
   background-color: rgb(255, 255, 255) !important;
   color:black !important;;
   }
  
  .code-block {
    background-color: #263238;
    color: white;
    font-family: Monaco, Consolas, monospace;
    font-size: .75em;
    line-height: 1.8;
  }

  .line-highlighter {
   background-color: #1c7276;
   color: white;
  }

  .line-highlighter-red {
   background-color: red;
   color: white;
  }

</style>

<h1 id="1-introduction">1. Introduction</h1>
<p>Windows 32-bit shellcode development is a process of writing executable code typically in 32-bit Windows that will be injected into the memory of a running process and will perform a specific operation i.e spawn reverse shell or calculator. In this series, I will write about how to write a custom shellcode from scratch covering basics to advanced.</p>

<h1 id="2-purpose">2. Purpose</h1>
<p>Writing custom shellcode is a critical skill in security research, penetration testing, and exploit development. While pre-made shellcode (like msfvenom payloads) exists, there are compelling reasons to craft custom shellcode. Modern systems have multiple layers of defenses to prevent exploitation using standard payloads. Custom shellcode helps evade these defenses such as:-</p>

<ul>
  <li>Antivirus (AV) and Endpoint Detection and Response (EDR):
    <ul>
      <li>Pre-built shellcode is often signature-based and easily detected.</li>
      <li>Custom shellcode can be obfuscated or encoded to bypass such detection.</li>
    </ul>
  </li>
  <li>Sometimes, scenario of security research or exploit development requires minimal length of shellcode.</li>
</ul>

<h1 id="3-what-is-a-shellcode">3. What is a shellcode?</h1>
<p>Shellcode is nothing but a hex representation of machine instructions, each byte separated by <code class="language-plaintext highlighter-rouge">\x</code>. You can find the shellcode instructions using <code class="language-plaintext highlighter-rouge">msf-nasm_shell</code> command as well in Linux. For example shellcode of <code class="language-plaintext highlighter-rouge">xor eax, eax</code> will <code class="language-plaintext highlighter-rouge">\x31\xC0</code> .</p>

<p><img src="/assets/images/exploit-development/windows-shellcode-development/msf-nasm1.png" alt="msf-nasm_shell" /></p>

<p>Therefore, you see shellcode, generated by msfvenom is normally in hex format.</p>

<h1 id="4-background-concept">4. Background Concept</h1>
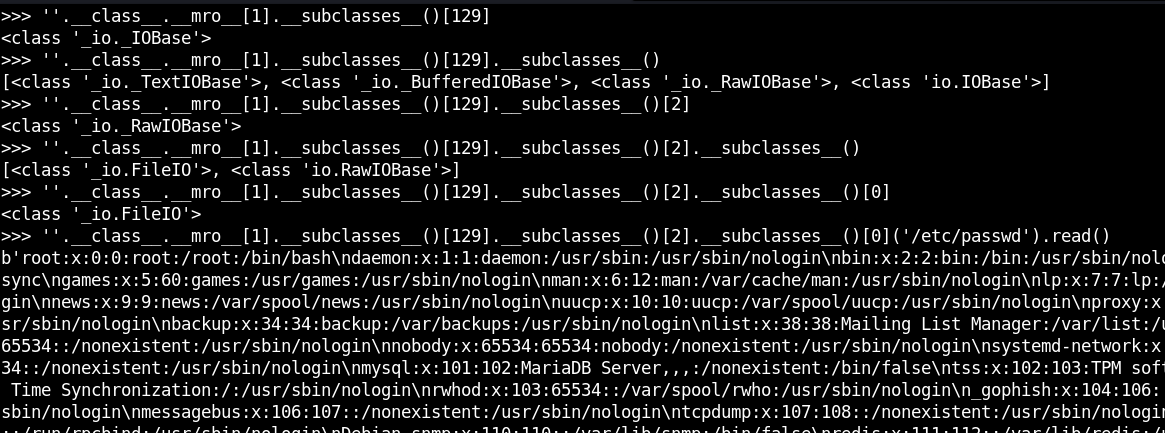
<p>If you understand about Server Side Template Injection (SSTI) vulnerability, you would have an idea that how SSTI payload works, We first load the relevant class in server’s memory and then execute function of that loaded class and pass relevant argument to it to achieve our goal as shown in below screenshot, where final payload is able to read the <code class="language-plaintext highlighter-rouge">/etc/passwd</code> file content:
<img src="/assets/images/exploit-development/windows-shellcode-development/ssti-concept1.png" alt="SSTI demo" /></p>

<p>From above image, it is revealed that starting from ‘str’ class we went deep and kept loading the classes until ‘_io.FileIO’ class which has ability to read file, whose path is provided as argument and then read function to retrieve the file content.</p>

<p>Similar concept applies to Windows shellcode development, we need to load the relevant Dynamic Link Library (dll) which has defined functions and by using those functions we find other functions and execute them to achieve our goal i.e trigger reverse shell or execute some other command.</p>

<h1 id="5-setup-environment">5. Setup Environment</h1>
<ol>
  <li>VirtualBox or VMWare</li>
  <li>Windows 10 32-bit in virtual environment</li>
  <li>Install Visual Studio Build Tools (C/C++), then microsoft command line compiler cl.exe will be installed</li>
  <li>Install WinDbg 32-bit version</li>
</ol>

<h1 id="6-compile-base-program">6. Compile base program</h1>
<p>After setting up development environment, we will write shellcode in assembly embeded inside a <code class="language-plaintext highlighter-rouge">c</code> program. So, open notepad and create a new file with <code class="language-plaintext highlighter-rouge">.c</code> extension having following code and save it.</p>

<div class="language-c highlighter-rouge"><div class="highlight"><pre class="highlight"><code><span class="cp">#include</span> <span class="cpf">&lt;windows.h&gt;</span><span class="cp">
</span>
<span class="kt">int</span> <span class="nf">main</span><span class="p">()</span>
<span class="p">{</span>
    <span class="n">_asm</span>
    <span class="p">{</span>
        <span class="n">xor</span> <span class="n">ecx</span><span class="p">,</span> <span class="n">ecx</span>    <span class="c1">//zero ecx</span>
        <span class="kt">int</span> <span class="mi">3</span>           <span class="c1">//breakpoint</span>
    <span class="p">}</span>
    <span class="k">return</span> <span class="mi">0</span><span class="p">;</span>
<span class="p">}</span>
</code></pre></div></div>

<!-- > "LoadLibraryA" Loads the specified module (in this case user32.dll) into the address space of the calling process. The specified module may cause other modules to be loaded. User32.dll is loaded so that we can use  -->

<blockquote>
  <p>The __asm keyword invokes the inline assembler and can appear wherever a C or C++ statement is legal. It can’t appear by itself. It must be followed by an assembly instruction, a group of instructions enclosed in braces, or, at minimum, an empty pair of braces.</p>
</blockquote>

<ol>
  <li>Open the “Developer command prompt for Visual Studio” with Administrator rights.</li>
  <li>Compile the <code class="language-plaintext highlighter-rouge">c</code> program with following command</li>
</ol>

<div class="language-batch highlighter-rouge"><div class="highlight"><pre class="highlight"><code><span class="kd">cl</span><span class="err">.exe</span> <span class="kd">shellcode</span>.c <span class="na">/Zi
</span></code></pre></div></div>

<ol>
  <li>
    <p>It will compile the program with debugging symbols and a <code class="language-plaintext highlighter-rouge">.pdb</code> file will also be generated along with <code class="language-plaintext highlighter-rouge">.exe</code>.</p>
  </li>
  <li>
    <p>Now run windbg and click on File -&gt; Open Executable -&gt; Select <code class="language-plaintext highlighter-rouge">.exe</code> file generated after compilation.</p>
  </li>
  <li>
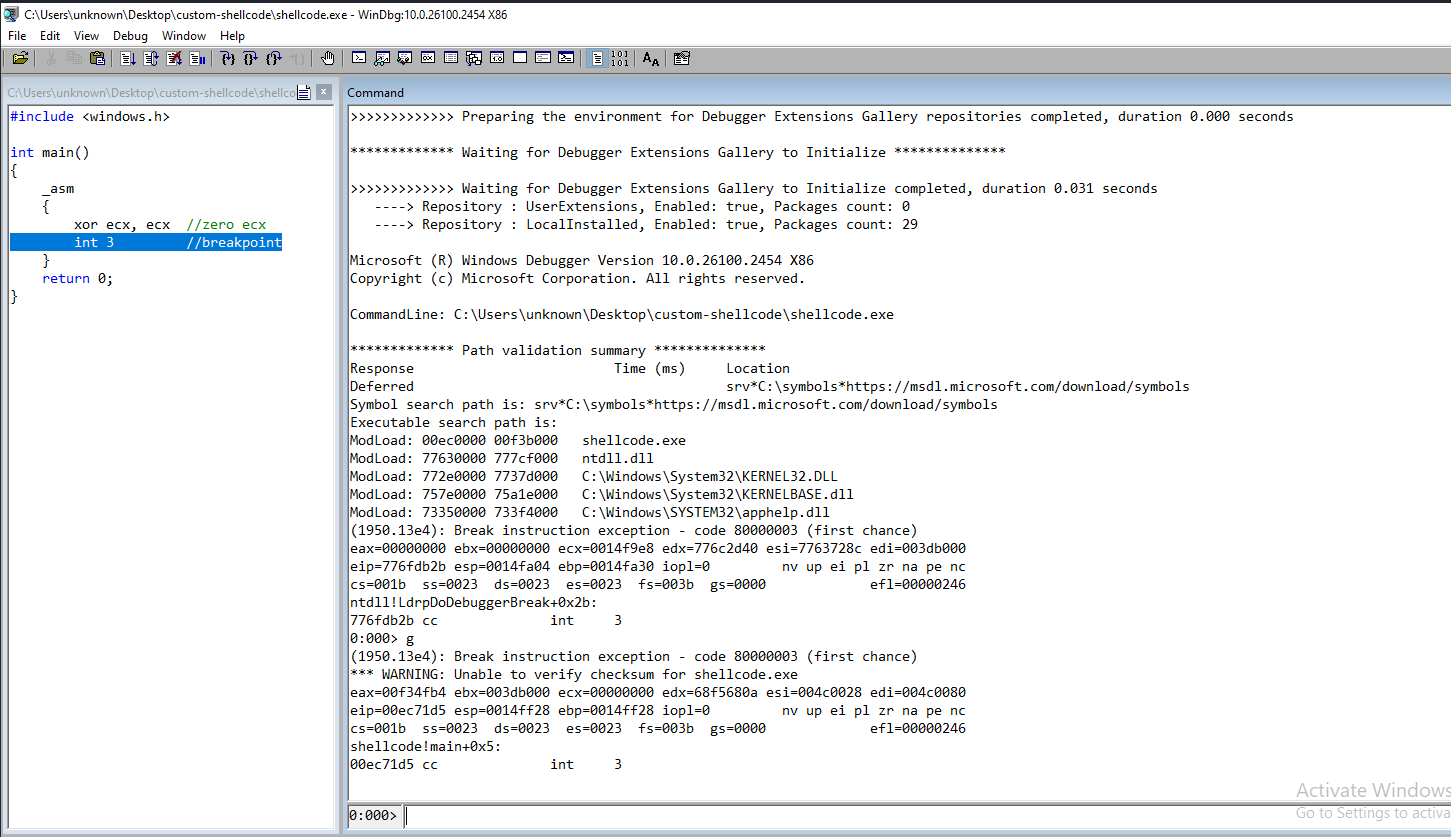
    <p>Windbg will automatically stop by hitting breakpoint before executing the loaded executable. Just enter <code class="language-plaintext highlighter-rouge">g</code> (go) command to run the application and it will again stop at our inserted breakpoint <code class="language-plaintext highlighter-rouge">int 3</code> as shown in figure below:</p>
  </li>
</ol>

<p><img src="/assets/images/exploit-development/windows-shellcode-development/windbg1.png" alt="Windbg" /></p>

<ol>
  <li>Windbg will also show the corresponding instruction in another section of actual <code class="language-plaintext highlighter-rouge">c</code> code.</li>
</ol>

<h1 id="7-process-of-writing-custom-shellcode">7. Process of writing custom shellcode</h1>
<ol>
  <li>Find <code class="one-word-highlight">kernelbase.dll</code> base address
    <blockquote>
      <p>After having kernelbase.dll base address, we will be able to enumerate in its memory space to find for exported functions.</p>
    </blockquote>
  </li>
  <li>Find Export Table</li>
</ol>

<blockquote>
  <p>Export table contains information like Address of function etc about all functions exported by dll.</p>
</blockquote>

<ol>
  <li>Find <code class="one-word-highlight">GetProcAddress</code> function exported by kernelbase.dll</li>
</ol>

<blockquote>
  <p>As microsoft says, GetProcAddress retrieves the address of an exported function (also known as a procedure) or variable from the specified dynamic-link library (DLL).</p>
</blockquote>

<ol>
  <li>Find <code class="one-word-highlight">LoadLibraryA</code> function using <code class="one-word-highlight">GetProcAddress</code> function</li>
</ol>

<blockquote>
  <p>So that we can load further dll i.e user32.dll to load functions of our interest which are not included in kernelbase.dll</p>
</blockquote>

<ol>
  <li>
    <p>Load <code class="one-word-highlight">user32.dll</code> in memory using <code class="one-word-highlight">LoadLibraryA</code></p>
  </li>
  <li>
    <p>Locate</p>
  </li>
</ol>

<h2 id="71-find-kernelbasedll-base-address">7.1 Find kernelbase.dll base address</h2>

<blockquote>
  <p>In Windows, certain DLL like ntdll.dll, kernel32.dll, kernelbase.dll etc. are almost always loaded into the address space of a process due to their essential role in system operations and process initialization.</p>
</blockquote>

<ol>
  <li>We need to check the elements of Thread Environment Block (TEB) structure as microsoft says:</li>
</ol>

<blockquote>
  <p>The Thread Environment Block (TEB) structure describes the state of a thread. 
It stores information about a single thread within a process. Each thread in a process has its own TEB, and this structure contains data that the thread needs to perform its tasks. So, our intention is the find the Process Environment Block (PEB) structure inside TEB. We can do this by using following command in windbg:</p>
</blockquote>

<div class="code-block">
<pre>
0:000&gt; dt _TEB @$teb
shellcode!_TEB
   +0x000 NtTib            : _NT_TIB
   +0x01c EnvironmentPointer : (null) 
   +0x020 ClientId         : _CLIENT_ID
   +0x028 ActiveRpcHandle  : (null) 
   +0x02c ThreadLocalStoragePointer : 0x00582e90 Void
   <span class="line-highlighter">+0x030 ProcessEnvironmentBlock : 0x00273000 _PEB</span>
   +0x034 LastErrorValue   : 0
   +0x038 CountOfOwnedCriticalSections : 0
   +0x03c CsrClientThread  : (null) 
   +0x040 Win32ThreadInfo  : (null) 

</pre>
</div>

<p>Reference: <a href="https://learn.microsoft.com/en-us/windows/win32/api/winternl/ns-winternl-teb">https://learn.microsoft.com/en-us/windows/win32/api/winternl/ns-winternl-teb</a></p>

<p>At offset of <code class="one-word-highlight">0x30</code> we can see Process Environment Block (_PEB) structure is located at address <code class="one-word-highlight">0x00273000</code>.  So, we can write following assembly code to reach <code class="one-word-highlight">_PEB</code></p>

<div class="language-nasm highlighter-rouge"><div class="highlight"><pre class="highlight"><code><span class="nf">int</span> <span class="mi">3</span>                           <span class="o">//</span> <span class="nv">insert</span> <span class="nv">breakpoint</span>
<span class="nf">xor</span> <span class="nb">ecx</span><span class="p">,</span> <span class="nb">ecx</span>                    <span class="o">//</span> <span class="nv">zero</span> <span class="nb">ecx</span>
<span class="nf">mov</span> <span class="nb">eax</span><span class="p">,</span> <span class="nb">fs</span><span class="p">:[</span><span class="nb">ecx</span><span class="o">+</span><span class="mh">0x30</span><span class="p">]</span>          <span class="o">//</span> <span class="nb">eax</span> <span class="err">=</span> <span class="nv">PEB</span>
</code></pre></div></div>

<h3 id="711-process-environment-block-peb">7.1.1 Process Environment Block (PEB)</h3>
<blockquote>
  <p>The _PEB (Process Environment Block) is a critical data structure in Windows operating systems. It provides a wealth of information about the process in which it resides, including its modules, environment variables, heap, and other runtime data. It is typically used internally by the operating system but is also of interest to developers, reverse engineers, and exploit developers.</p>
</blockquote>

<div class="language-c highlighter-rouge"><div class="highlight"><pre class="highlight"><code><span class="k">typedef</span> <span class="k">struct</span> <span class="n">_PEB</span> <span class="p">{</span>
  <span class="n">BYTE</span>                          <span class="n">Reserved1</span><span class="p">[</span><span class="mi">2</span><span class="p">];</span>
  <span class="n">BYTE</span>                          <span class="n">BeingDebugged</span><span class="p">;</span>
  <span class="n">BYTE</span>                          <span class="n">Reserved2</span><span class="p">[</span><span class="mi">1</span><span class="p">];</span>
  <span class="n">PVOID</span>                         <span class="n">Reserved3</span><span class="p">[</span><span class="mi">2</span><span class="p">];</span>
  <span class="n">PPEB_LDR_DATA</span>                 <span class="n">Ldr</span><span class="p">;</span>
  <span class="n">PRTL_USER_PROCESS_PARAMETERS</span>  <span class="n">ProcessParameters</span><span class="p">;</span>
  <span class="n">PVOID</span>                         <span class="n">Reserved4</span><span class="p">[</span><span class="mi">3</span><span class="p">];</span>
  <span class="n">PVOID</span>                         <span class="n">AtlThunkSListPtr</span><span class="p">;</span>
  <span class="n">PVOID</span>                         <span class="n">Reserved5</span><span class="p">;</span>
  <span class="n">ULONG</span>                         <span class="n">Reserved6</span><span class="p">;</span>
  <span class="n">PVOID</span>                         <span class="n">Reserved7</span><span class="p">;</span>
  <span class="n">ULONG</span>                         <span class="n">Reserved8</span><span class="p">;</span>
  <span class="n">ULONG</span>                         <span class="n">AtlThunkSListPtr32</span><span class="p">;</span>
  <span class="n">PVOID</span>                         <span class="n">Reserved9</span><span class="p">[</span><span class="mi">45</span><span class="p">];</span>
  <span class="n">BYTE</span>                          <span class="n">Reserved10</span><span class="p">[</span><span class="mi">96</span><span class="p">];</span>
  <span class="n">PPS_POST_PROCESS_INIT_ROUTINE</span> <span class="n">PostProcessInitRoutine</span><span class="p">;</span>
  <span class="n">BYTE</span>                          <span class="n">Reserved11</span><span class="p">[</span><span class="mi">128</span><span class="p">];</span>
  <span class="n">PVOID</span>                         <span class="n">Reserved12</span><span class="p">[</span><span class="mi">1</span><span class="p">];</span>
  <span class="n">ULONG</span>                         <span class="n">SessionId</span><span class="p">;</span>
<span class="p">}</span> <span class="n">PEB</span><span class="p">,</span> <span class="o">*</span><span class="n">PPEB</span><span class="p">;</span>
</code></pre></div></div>

<p>We are primarily interested in <code class="one-word-highlight">Ldr</code>  (A pointer to a PEB_LDR_DATA structure that contains information about the loaded modules for the process) element.</p>

<blockquote>
  <p>Reserved1[2] means an array of 2 elements and the type of this array is BYTE, so 2 * 1 = 2 BYTES means first member will occupy 2 BYTES and PVOID represents pointer which is of 4 BYTES and Reserved[2] means 2 elements of type pointer means 4 * 2 = 8 BYTES, So as per this calculation we can reach at <code class="one-word-highlight">Ldr</code> member at an offset of 0xC</p>
</blockquote>

<div class="language-c highlighter-rouge"><div class="highlight"><pre class="highlight"><code><span class="n">BYTE</span>  <span class="n">Reserved1</span><span class="p">[</span><span class="mi">2</span><span class="p">]</span>  <span class="o">=</span> <span class="mi">1</span> <span class="o">*</span> <span class="mi">2</span> <span class="o">=</span> <span class="mi">2</span>
<span class="n">BYTE</span>  <span class="n">BeingDebugged</span> <span class="o">=</span> <span class="mi">1</span> <span class="o">*</span> <span class="mi">1</span> <span class="o">=</span> <span class="mi">1</span>
<span class="n">BYTE</span>  <span class="n">Reserved2</span><span class="p">[</span><span class="mi">1</span><span class="p">]</span>  <span class="o">=</span> <span class="mi">1</span> <span class="o">*</span> <span class="mi">1</span> <span class="o">=</span> <span class="mi">1</span>
<span class="n">PVOID</span> <span class="n">Reserved3</span><span class="p">[</span><span class="mi">2</span><span class="p">]</span>  <span class="o">=</span> <span class="mi">4</span> <span class="o">*</span> <span class="mi">2</span> <span class="o">=</span> <span class="mi">8</span>
<span class="n">Total</span>               <span class="o">=</span> <span class="mi">2</span> <span class="o">+</span> <span class="mi">1</span> <span class="o">+</span> <span class="mi">1</span> <span class="o">+</span> <span class="mi">8</span> <span class="o">=</span> <span class="mi">12</span> <span class="n">BYTES</span> <span class="p">(</span><span class="mh">0xC</span> <span class="n">in</span> <span class="n">hex</span><span class="p">)</span>
</code></pre></div></div>
<p>Let’s enumerate _PEB using command <code class="language-plaintext highlighter-rouge">dt _PEB &lt;address_of_PEB&gt;</code></p>

<div class="code-block">
<pre>
0:000&gt; dt _PEB 0x00273000 
shellcode!_PEB
   +0x000 InheritedAddressSpace : 0 ''
   +0x001 ReadImageFileExecOptions : 0 ''
   +0x002 BeingDebugged    : 0x1 ''
   +0x003 BitField         : 0x4 ''
   +0x003 ImageUsesLargePages : 0y0
   +0x003 IsProtectedProcess : 0y0
   +0x003 IsImageDynamicallyRelocated : 0y1
   +0x003 SkipPatchingUser32Forwarders : 0y0
   +0x003 IsPackagedProcess : 0y0
   +0x003 IsAppContainer   : 0y0
   +0x003 IsProtectedProcessLight : 0y0
   +0x003 IsLongPathAwareProcess : 0y0
   +0x004 Mutant           : 0xffffffff Void
   +0x008 ImageBaseAddress : 0x00010000 Void
   <span class="line-highlighter">+0x00c Ldr              : 0x773e1c60 _PEB_LDR_DATA</span>
   +0x010 ProcessParameters : 0x00581c60 _RTL_USER_PROCESS_PARAMETERS
</pre>
</div>

<p>Here <strong>Ldr</strong> at an offset of <code class="one-word-highlight">0xc</code>is a pointer, pointing to _PEB_LDR_DATA structure.</p>

<p>So, we can write following assembly code to reach <code class="one-word-highlight">_PEB_LDR_DATA</code></p>

<div class="language-nasm highlighter-rouge"><div class="highlight"><pre class="highlight"><code><span class="nf">int</span> <span class="mi">3</span>                           <span class="o">//</span> <span class="nv">insert</span> <span class="nv">breakpoint</span>
<span class="nf">xor</span> <span class="nb">ecx</span><span class="p">,</span> <span class="nb">ecx</span>                    <span class="o">//</span> <span class="nv">zero</span> <span class="nb">ecx</span>
<span class="nf">mov</span> <span class="nb">eax</span><span class="p">,</span> <span class="nb">fs</span><span class="p">:[</span><span class="nb">ecx</span><span class="o">+</span><span class="mh">0x30</span><span class="p">]</span>          <span class="o">//</span> <span class="nb">eax</span> <span class="err">=</span> <span class="nv">PEB</span>
<span class="nf">mov</span> <span class="nb">eax</span><span class="p">,</span> <span class="p">[</span><span class="nb">eax</span><span class="o">+</span><span class="mh">0x0c</span><span class="p">]</span>             <span class="o">//</span> <span class="nb">eax</span> <span class="err">=</span> <span class="nv">_PEB_LDR_DATA</span>
</code></pre></div></div>

<blockquote>
  <p><em>Did you notice difference between _PEB layout and view in windbg? I leave it on you to research its answer.</em></p>
</blockquote>

<h3 id="712-_peb_ldr_data-structure">7.1.2 _PEB_LDR_DATA structure</h3>
<blockquote>
  <p>The _PEB_LDR_DATA structure is part of the Process Environment Block (PEB), which provides critical information about the process and its modules in a Windows system. This structure specifically manages information about the loaded modules (DLLs) in a process.</p>
</blockquote>

<p>Here is a typical layout of the _PEB_LDR_DATA structure:</p>

<div class="language-c highlighter-rouge"><div class="highlight"><pre class="highlight"><code><span class="k">typedef</span> <span class="k">struct</span> <span class="n">_PEB_LDR_DATA</span> <span class="p">{</span>
    <span class="n">ULONG</span> <span class="n">Length</span><span class="p">;</span>                      <span class="c1">// Size of the structure</span>
    <span class="n">BOOLEAN</span> <span class="n">Initialized</span><span class="p">;</span>               <span class="c1">// Flag indicating if the structure is initialized</span>
    <span class="n">HANDLE</span> <span class="n">SsHandle</span><span class="p">;</span>                   <span class="c1">// Reserved (not used)</span>
    <span class="n">LIST_ENTRY</span> <span class="n">InLoadOrderModuleList</span><span class="p">;</span>  <span class="c1">// List of modules in load order</span>
    <span class="n">LIST_ENTRY</span> <span class="n">InMemoryOrderModuleList</span><span class="p">;</span> <span class="c1">// List of modules in memory order</span>
    <span class="n">LIST_ENTRY</span> <span class="n">InInitializationOrderModuleList</span><span class="p">;</span> <span class="c1">// List of modules in initialization order</span>
<span class="p">}</span> <span class="n">PEB_LDR_DATA</span><span class="p">,</span> <span class="o">*</span><span class="n">PPEB_LDR_DATA</span><span class="p">;</span>
</code></pre></div></div>
<p>Let’s validate it using windbg <code class="language-plaintext highlighter-rouge">dt</code> command as below:</p>

<div class="code-block">
<pre>
0:000&gt; ? poi(@$peb+0xc)
Evaluate expression: 2000559200 = 773e1c60
0:000&gt; dt _PEB_LDR_DATA 0x773e1c60 
shellcode!_PEB_LDR_DATA
   +0x000 Length           : 0x30
   +0x004 Initialized      : 0x1 ''
   +0x008 SsHandle         : (null) 
   <span class="line-highlighter">+0x00c InLoadOrderModuleList : _LIST_ENTRY [ 0x5824e0 - 0x582c90 ]</span>
   <span class="line-highlighter">+0x014 InMemoryOrderModuleList : _LIST_ENTRY [ 0x5824e8 - 0x582c98 ]</span>
   <span class="line-highlighter">+0x01c InInitializationOrderModuleList : _LIST_ENTRY [ 0x5823e8 - 0x5828d0 ]</span>
   +0x024 EntryInProgress  : (null) 
   +0x028 ShutdownInProgress : 0 ''
   +0x02c ShutdownThreadId : (null) 
</pre>
</div>

<p>Members of _PEB_LDR_DATA structure that are of our interest are as follows:-</p>

<ul>
  <li>
    <p><strong>InLoadOrderModuleList</strong>: A doubly linked list containing entries for all loaded modules (DLLs) in the order they were loaded. Each entry is of type <code class="one-word-highlight">_LDR_DATA_TABLE_ENTRY</code></p>
  </li>
  <li>
    <p><strong>InMemoryOrderModuleList</strong>: A doubly linked list of modules ordered by their memory address. Useful for operations involving address ranges or base addresses of DLLs.</p>
  </li>
  <li>
    <p><strong>InInitializationOrderModuleList</strong>: A doubly linked list of modules in the order they were initialized. Ensures proper initialization sequencing for dependent modules.</p>
  </li>
</ul>

<p>We will deep dive into <strong>InMemoryOrderModuleList</strong>. Let’s display <em>InMemoryOrderModuleList</em> of type <em>_LIST_ENTRY</em> as shown below:</p>

<div class="code-block">
<pre>
0:000&gt; ? poi(poi(@$peb+0xc)+0x14)
Evaluate expression: 5776616 = 005824e8
0:000&gt; dt _LIST_ENTRY 005824e8
shellcode!_LIST_ENTRY
 [ 0x5823e0 - 0x773e1c74 ]
   <span class="line-highlighter">+0x000 Flink            : 0x005823e0 _LIST_ENTRY [ 0x5828c8 - 0x5824e8 ]</span>
   +0x004 Blink            : 0x773e1c74 _LIST_ENTRY [ 0x5824e8 - 0x582c98 ]
</pre>
</div>

<p>LIST_ENTRY structure is a double link list and contains two elements in each node Flink (Forward Link - 4 Bytes) and Blink (Backward Link - 4 Bytes). So each node is of 8 Bytes in size.</p>

<p><strong>Note</strong>: Important thing to note here is that <code class="one-word-highlight">_LDR_DATA_TABLE_ENTRY</code> is itself a member of <code class="one-word-highlight">_PEB_LDR_DATA</code> structure at offset 0x8 from <strong>InMemoryOrderLinks</strong>. When we displayed <strong>_LDR_DATA_TABLE_ENTRY</strong> from 0x8 in backward it is shown as below:</p>

<div class="code-block">
<pre>
0:000&gt; dt _LDR_DATA_TABLE_ENTRY 0x5824e8-0x8
ntdll!_LDR_DATA_TABLE_ENTRY
   +0x000 InLoadOrderLinks : _LIST_ENTRY [ 0x5823d8 - 0x773e1c6c ]
   +0x008 InMemoryOrderLinks : _LIST_ENTRY [ 0x5823e0 - 0x773e1c74 ]
   +0x010 InInitializationOrderLinks : _LIST_ENTRY [ 0x0 - 0x0 ]
   <span class="line-highlighter">+0x018 DllBase          : 0x00010000 Void</span>
   +0x01c EntryPoint       : 0x00011140 Void
   +0x020 SizeOfImage      : 0x7b000
   +0x024 FullDllName      : _UNICODE_STRING "C:\Users\unknown\Desktop\custom-shellcode\shellcode.exe"
   <span class="line-highlighter">+0x02c BaseDllName      : _UNICODE_STRING "shellcode.exe"</span>
</pre>
</div>

<p>Excellent! We are able to see the dll base address at an offset of <strong>0x18</strong> in <em>DllBase</em> property and dll name at an offset of <strong>0x2c</strong> in <em>BaseDllName</em> property in first node of double linked list. In the same way, we can move forward to check the dll info in second node as shown below:</p>

<div class="code-block">
<pre>
0:000&gt; dt _LDR_DATA_TABLE_ENTRY 0x4a23e0-0x8
ntdll!_LDR_DATA_TABLE_ENTRY
   +0x000 InLoadOrderLinks : _LIST_ENTRY [ 0x4a28c0 - 0x4a24e0 ]
   +0x008 InMemoryOrderLinks : _LIST_ENTRY [ 0x4a28c8 - 0x4a24e8 ]
   +0x010 InInitializationOrderLinks : _LIST_ENTRY [ 0x4a2ca0 - 0x77321c7c ]
   <span class="line-highlighter">+0x018 DllBase          : 0x77200000 Void</span>
   +0x01c EntryPoint       : (null) 
   +0x020 SizeOfImage      : 0x19f000
   +0x024 FullDllName      : _UNICODE_STRING "C:\Windows\SYSTEM32\ntdll.dll"
   <span class="line-highlighter">+0x02c BaseDllName      : _UNICODE_STRING "ntdll.dll"</span>
</pre>
</div>

<p>Let’s check the third node.</p>

<div class="code-block">
<pre>
0:000&gt; dt _LDR_DATA_TABLE_ENTRY 0x4a28c8-0x8
ntdll!_LDR_DATA_TABLE_ENTRY
   +0x000 InLoadOrderLinks : _LIST_ENTRY [ 0x4a2c90 - 0x4a23d8 ]
   +0x008 InMemoryOrderLinks : _LIST_ENTRY [ 0x4a2c98 - 0x4a23e0 ]
   +0x010 InInitializationOrderLinks : _LIST_ENTRY [ 0x4a2b00 - 0x4a2ca0 ]
   <span class="line-highlighter">+0x018 DllBase          : 0x76070000 Void</span>
   +0x01c EntryPoint       : 0x7608d890 Void
   +0x020 SizeOfImage      : 0x9d000
   +0x024 FullDllName      : _UNICODE_STRING "C:\Windows\System32\KERNEL32.DLL"
   <span class="line-highlighter">+0x02c BaseDllName      : _UNICODE_STRING "KERNEL32.DLL"</span>
</pre>
</div>

<p>Let’s check the fourth node.</p>

<div class="code-block">
<pre>
0:000&gt; dt _LDR_DATA_TABLE_ENTRY 0x4a2c98-0x8
ntdll!_LDR_DATA_TABLE_ENTRY
   +0x000 InLoadOrderLinks : _LIST_ENTRY [ 0x4a2af0 - 0x4a28c0 ]
   +0x008 InMemoryOrderLinks : _LIST_ENTRY [ 0x4a2af8 - 0x4a28c8 ]
   +0x010 InInitializationOrderLinks : _LIST_ENTRY [ 0x4a28d0 - 0x4a23e8 ]
   <span class="line-highlighter-red">+0x018 DllBase          : 0x75130000 Void</span>
   +0x01c EntryPoint       : 0x7522c410 Void
   +0x020 SizeOfImage      : 0x23e000
   +0x024 FullDllName      : _UNICODE_STRING "C:\Windows\System32\KERNELBASE.dll"
   <span class="line-highlighter-red">+0x02c BaseDllName      : _UNICODE_STRING "KERNELBASE.dll"</span>
</pre>
</div>

<p>So, we can write following assembly code to reach the node having <code class="one-word-highlight">kernelbase.dll</code> info.</p>

<div class="language-nasm highlighter-rouge"><div class="highlight"><pre class="highlight"><code><span class="nf">int</span> <span class="mi">3</span>                           <span class="o">//</span> <span class="nv">insert</span> <span class="nv">breakpoint</span>
<span class="nf">xor</span> <span class="nb">ecx</span><span class="p">,</span> <span class="nb">ecx</span>                    <span class="o">//</span> <span class="nv">zero</span> <span class="nb">ecx</span>
<span class="nf">mov</span> <span class="nb">eax</span><span class="p">,</span> <span class="nb">fs</span><span class="p">:[</span><span class="nb">ecx</span><span class="o">+</span><span class="mh">0x30</span><span class="p">]</span>          <span class="o">//</span> <span class="nb">eax</span> <span class="err">=</span> <span class="nv">PEB</span>
<span class="nf">mov</span> <span class="nb">eax</span><span class="p">,</span> <span class="p">[</span><span class="nb">eax</span><span class="o">+</span><span class="mh">0x0c</span><span class="p">]</span>             <span class="o">//</span> <span class="nb">eax</span> <span class="err">=</span> <span class="nv">_PEB_LDR_DATA</span>
<span class="nf">mov</span> <span class="nb">eax</span><span class="p">,</span> <span class="p">[</span><span class="nb">eax</span><span class="o">+</span><span class="mh">0x14</span><span class="p">]</span>             <span class="o">//</span> <span class="nb">eax</span> <span class="err">=</span> <span class="nv">shellcode.exe</span> <span class="nv">or</span> <span class="nv">first</span> <span class="nv">node</span>
<span class="nf">mov</span> <span class="nb">eax</span><span class="p">,</span> <span class="p">[</span><span class="nb">eax</span><span class="p">]</span>                  <span class="o">//</span> <span class="nb">eax</span> <span class="err">=</span> <span class="nv">ntdll.dll</span>
<span class="nf">mov</span> <span class="nb">eax</span><span class="p">,</span> <span class="p">[</span><span class="nb">eax</span><span class="p">]</span>                  <span class="o">//</span> <span class="nb">eax</span> <span class="err">=</span> <span class="nv">kernel32.dll</span>
<span class="nf">mov</span> <span class="nb">eax</span><span class="p">,</span> <span class="p">[</span><span class="nb">eax</span><span class="p">]</span>                  <span class="o">//</span> <span class="nb">eax</span> <span class="err">=</span> <span class="nv">kernelbase.dll</span>
<span class="nf">mov</span> <span class="nb">ebx</span><span class="p">,</span> <span class="p">[</span><span class="nb">eax</span><span class="o">+</span><span class="mh">0x10</span><span class="p">]</span>             <span class="o">//</span> <span class="nb">ebx</span> <span class="err">=</span> <span class="nb">Dl</span><span class="nv">lBase</span>
</code></pre></div></div>

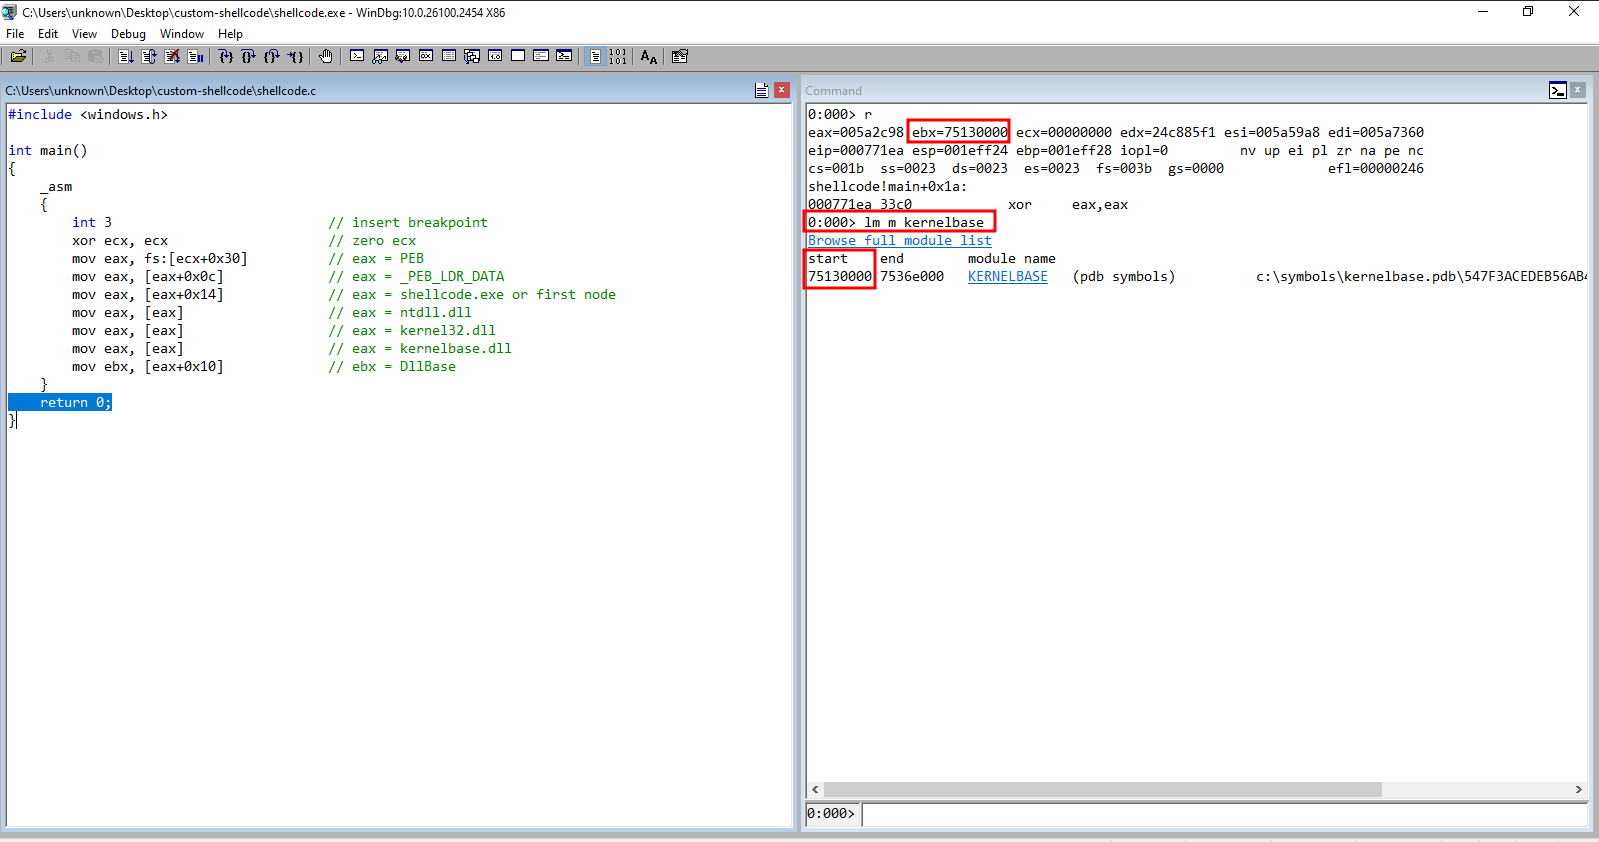
<p>Add the code inside <code class="language-plaintext highlighter-rouge">_asm</code> block, recompile and load the binary in windbg and by using <code class="language-plaintext highlighter-rouge">t</code> command analyse the value in ebx register at the end as shown below:</p>

<p><img src="/assets/images/exploit-development/windows-shellcode-development/baseaddress_fetche1.png" alt="Base Address" /></p>]]></content><author><name>Hamza Nadeem</name></author><category term="exploit-development" /><category term="shellcode" /><category term="windows" /><summary type="html"><![CDATA[]]></summary><media:thumbnail xmlns:media="http://search.yahoo.com/mrss/" url="http://localhost:4000/assets/images/shellcode-development1.png" /><media:content medium="image" url="http://localhost:4000/assets/images/shellcode-development1.png" xmlns:media="http://search.yahoo.com/mrss/" /></entry><entry><title type="html">Windows 32-bit Custom Shellcode Development Part 2</title><link href="http://localhost:4000/windows-32bit-custom-shellcode-development/part2/" rel="alternate" type="text/html" title="Windows 32-bit Custom Shellcode Development Part 2" /><published>2025-01-15T00:00:00+03:00</published><updated>2025-01-15T00:00:00+03:00</updated><id>http://localhost:4000/windows-32bit-custom-shellcode-development/Windows32-bit-custom-shellcode-part2</id><content type="html" xml:base="http://localhost:4000/windows-32bit-custom-shellcode-development/part2/"><![CDATA[<p>Content coming soon.</p>]]></content><author><name>Hamza Nadeem</name></author><category term="exploit-development" /><category term="shellcode" /><category term="windows" /><summary type="html"><![CDATA[Content coming soon.]]></summary><media:thumbnail xmlns:media="http://search.yahoo.com/mrss/" url="http://localhost:4000/assets/images/shellcode-development2.png" /><media:content medium="image" url="http://localhost:4000/assets/images/shellcode-development2.png" xmlns:media="http://search.yahoo.com/mrss/" /></entry><entry><title type="html">Windows 32-bit Custom Shellcode Development Part 3</title><link href="http://localhost:4000/windows-32bit-custom-shellcode-development/part3/" rel="alternate" type="text/html" title="Windows 32-bit Custom Shellcode Development Part 3" /><published>2025-01-15T00:00:00+03:00</published><updated>2025-01-15T00:00:00+03:00</updated><id>http://localhost:4000/windows-32bit-custom-shellcode-development/Windows32-bit-custom-shellcode-part3</id><content type="html" xml:base="http://localhost:4000/windows-32bit-custom-shellcode-development/part3/"><![CDATA[<p>Content coming soon.</p>]]></content><author><name>Hamza Nadeem</name></author><category term="exploit-development" /><category term="shellcode" /><category term="windows" /><summary type="html"><![CDATA[Content coming soon.]]></summary><media:thumbnail xmlns:media="http://search.yahoo.com/mrss/" url="http://localhost:4000/assets/images/shellcode-development3.png" /><media:content medium="image" url="http://localhost:4000/assets/images/shellcode-development3.png" xmlns:media="http://search.yahoo.com/mrss/" /></entry></feed>